Macrame Plant Hangers from Scratch
In this post I’ll go over the different knots I used to make these planters.
I’m going to start by apologising. This post was supposed to be written and published on Sunday night at the latest…but the weekend was so nice and sunny I just didn’t want to spend it in front of the laptop. But it’s here now! And if you did order your materials online, then you’re probably still waiting for them (at least, that’s what I’m telling myself.) My best advice for making your hanger is to learn some knots and then draw a plan/design. I went straight into it and ended up taking one of them apart because I wasn’t happy with it. Be patient with yourself and take breaks when you get frustrated (which I did!).
This week has seen almost zero activity worth discussing. We’ve been eating really well and cooking some really nice meals which has helped keep things a bit more interesting. On Sunday I made roast lamb breast which was so good. Lamb breast is generally pretty cheap, I got two for £3.50 in Carmarthen once! (is this what my life has become, comparing the price of meat!?)…if you have a decent butcher, this recipe is the one. I’ve also been getting really into home-made coleslaw - cheap and easy. If you have any quick, tasty, go-to recipes you’ve been rinsing this lockdown, I’d love it if you sent me a link in the comments - tried and tested recipes are always the best.
Project time – 4+ hours making time
Price – £12 - £ 20 to make 3
Pros
No need for specialist tools
You can get as creative as you like
Cons
It takes a while to get to grips with the knots
If you have just stumbled across this post, I suggest you start with the previous one which shows how I made the pots using air drying clay. If you’re just interested in the macrame knots, crack on! The previous post includes all the tools and materials you’ll need for the whole project including pots. For this part you’ll just need macrame cord and scissors. The initial inspo for this project came from Charlotte from Twin Made. She generously sent me one of her tutorials for making a plant hanger from an old t-shirt. Definitely check her out if you’re looking for creative projects.
Tools
20 metres Macrame cord - this is the one I used but for some reason the dark beige colour I ordered is no longer available. There are other colours to choose from though.
Scissors

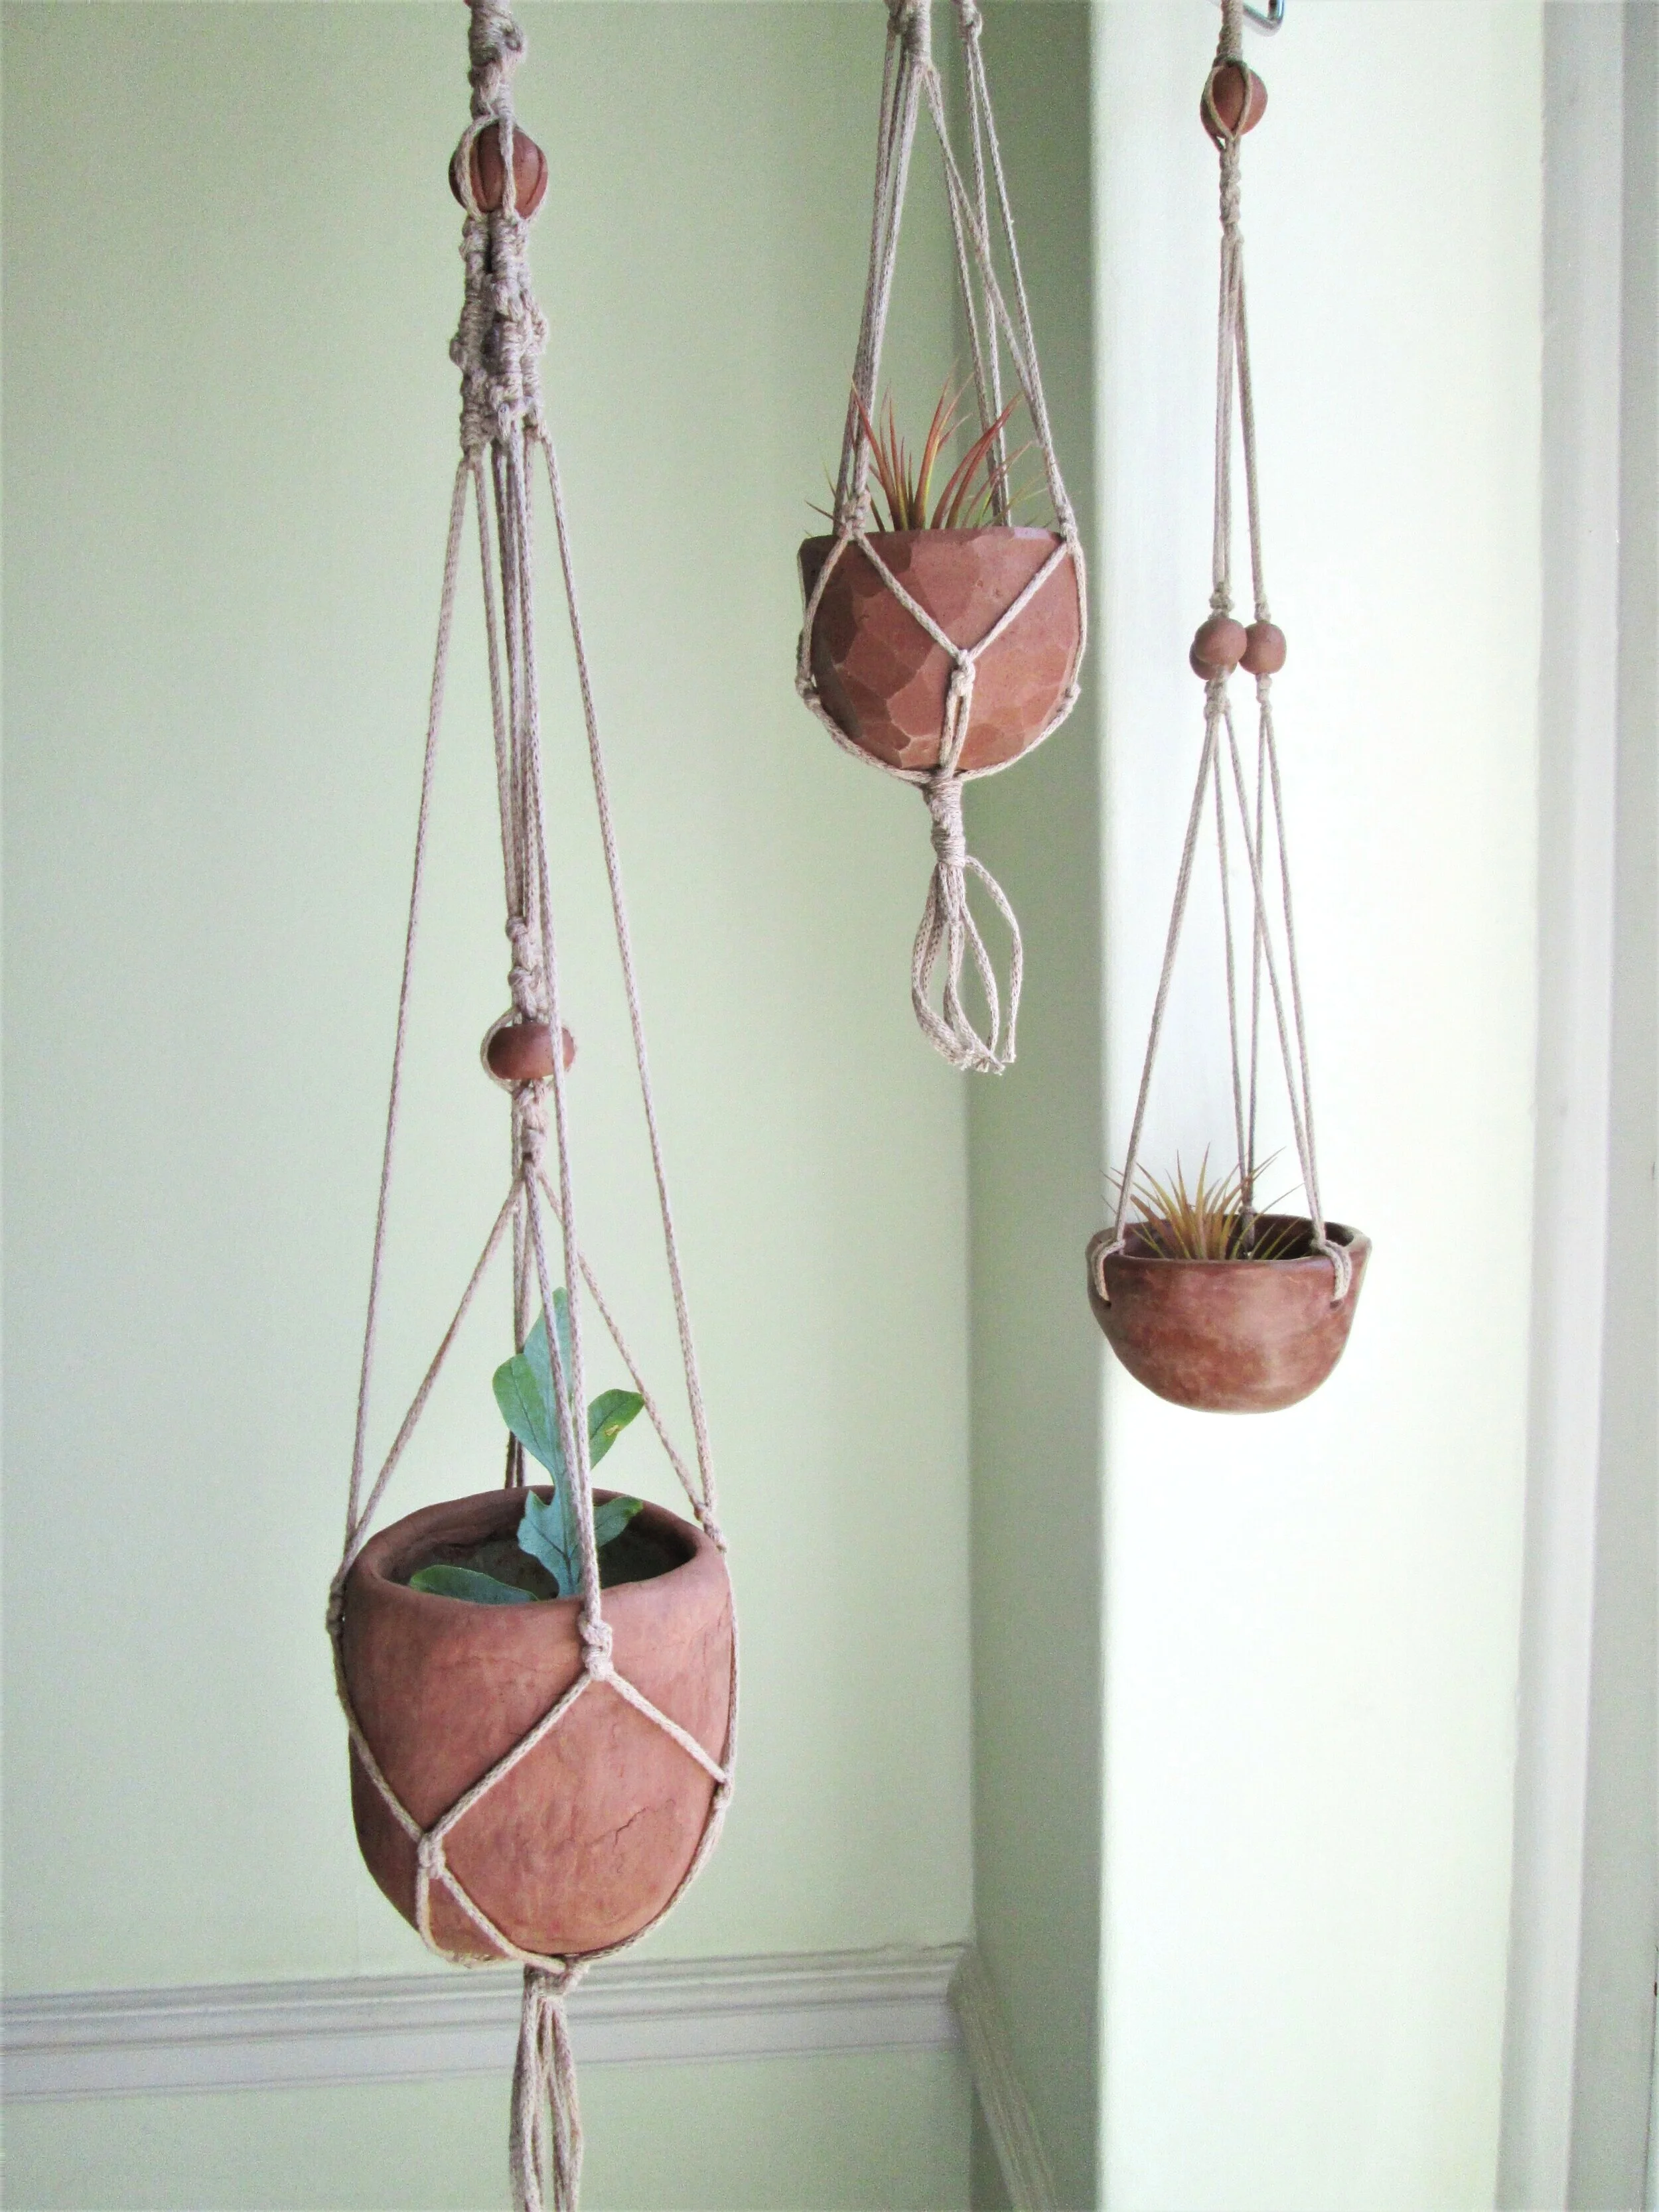
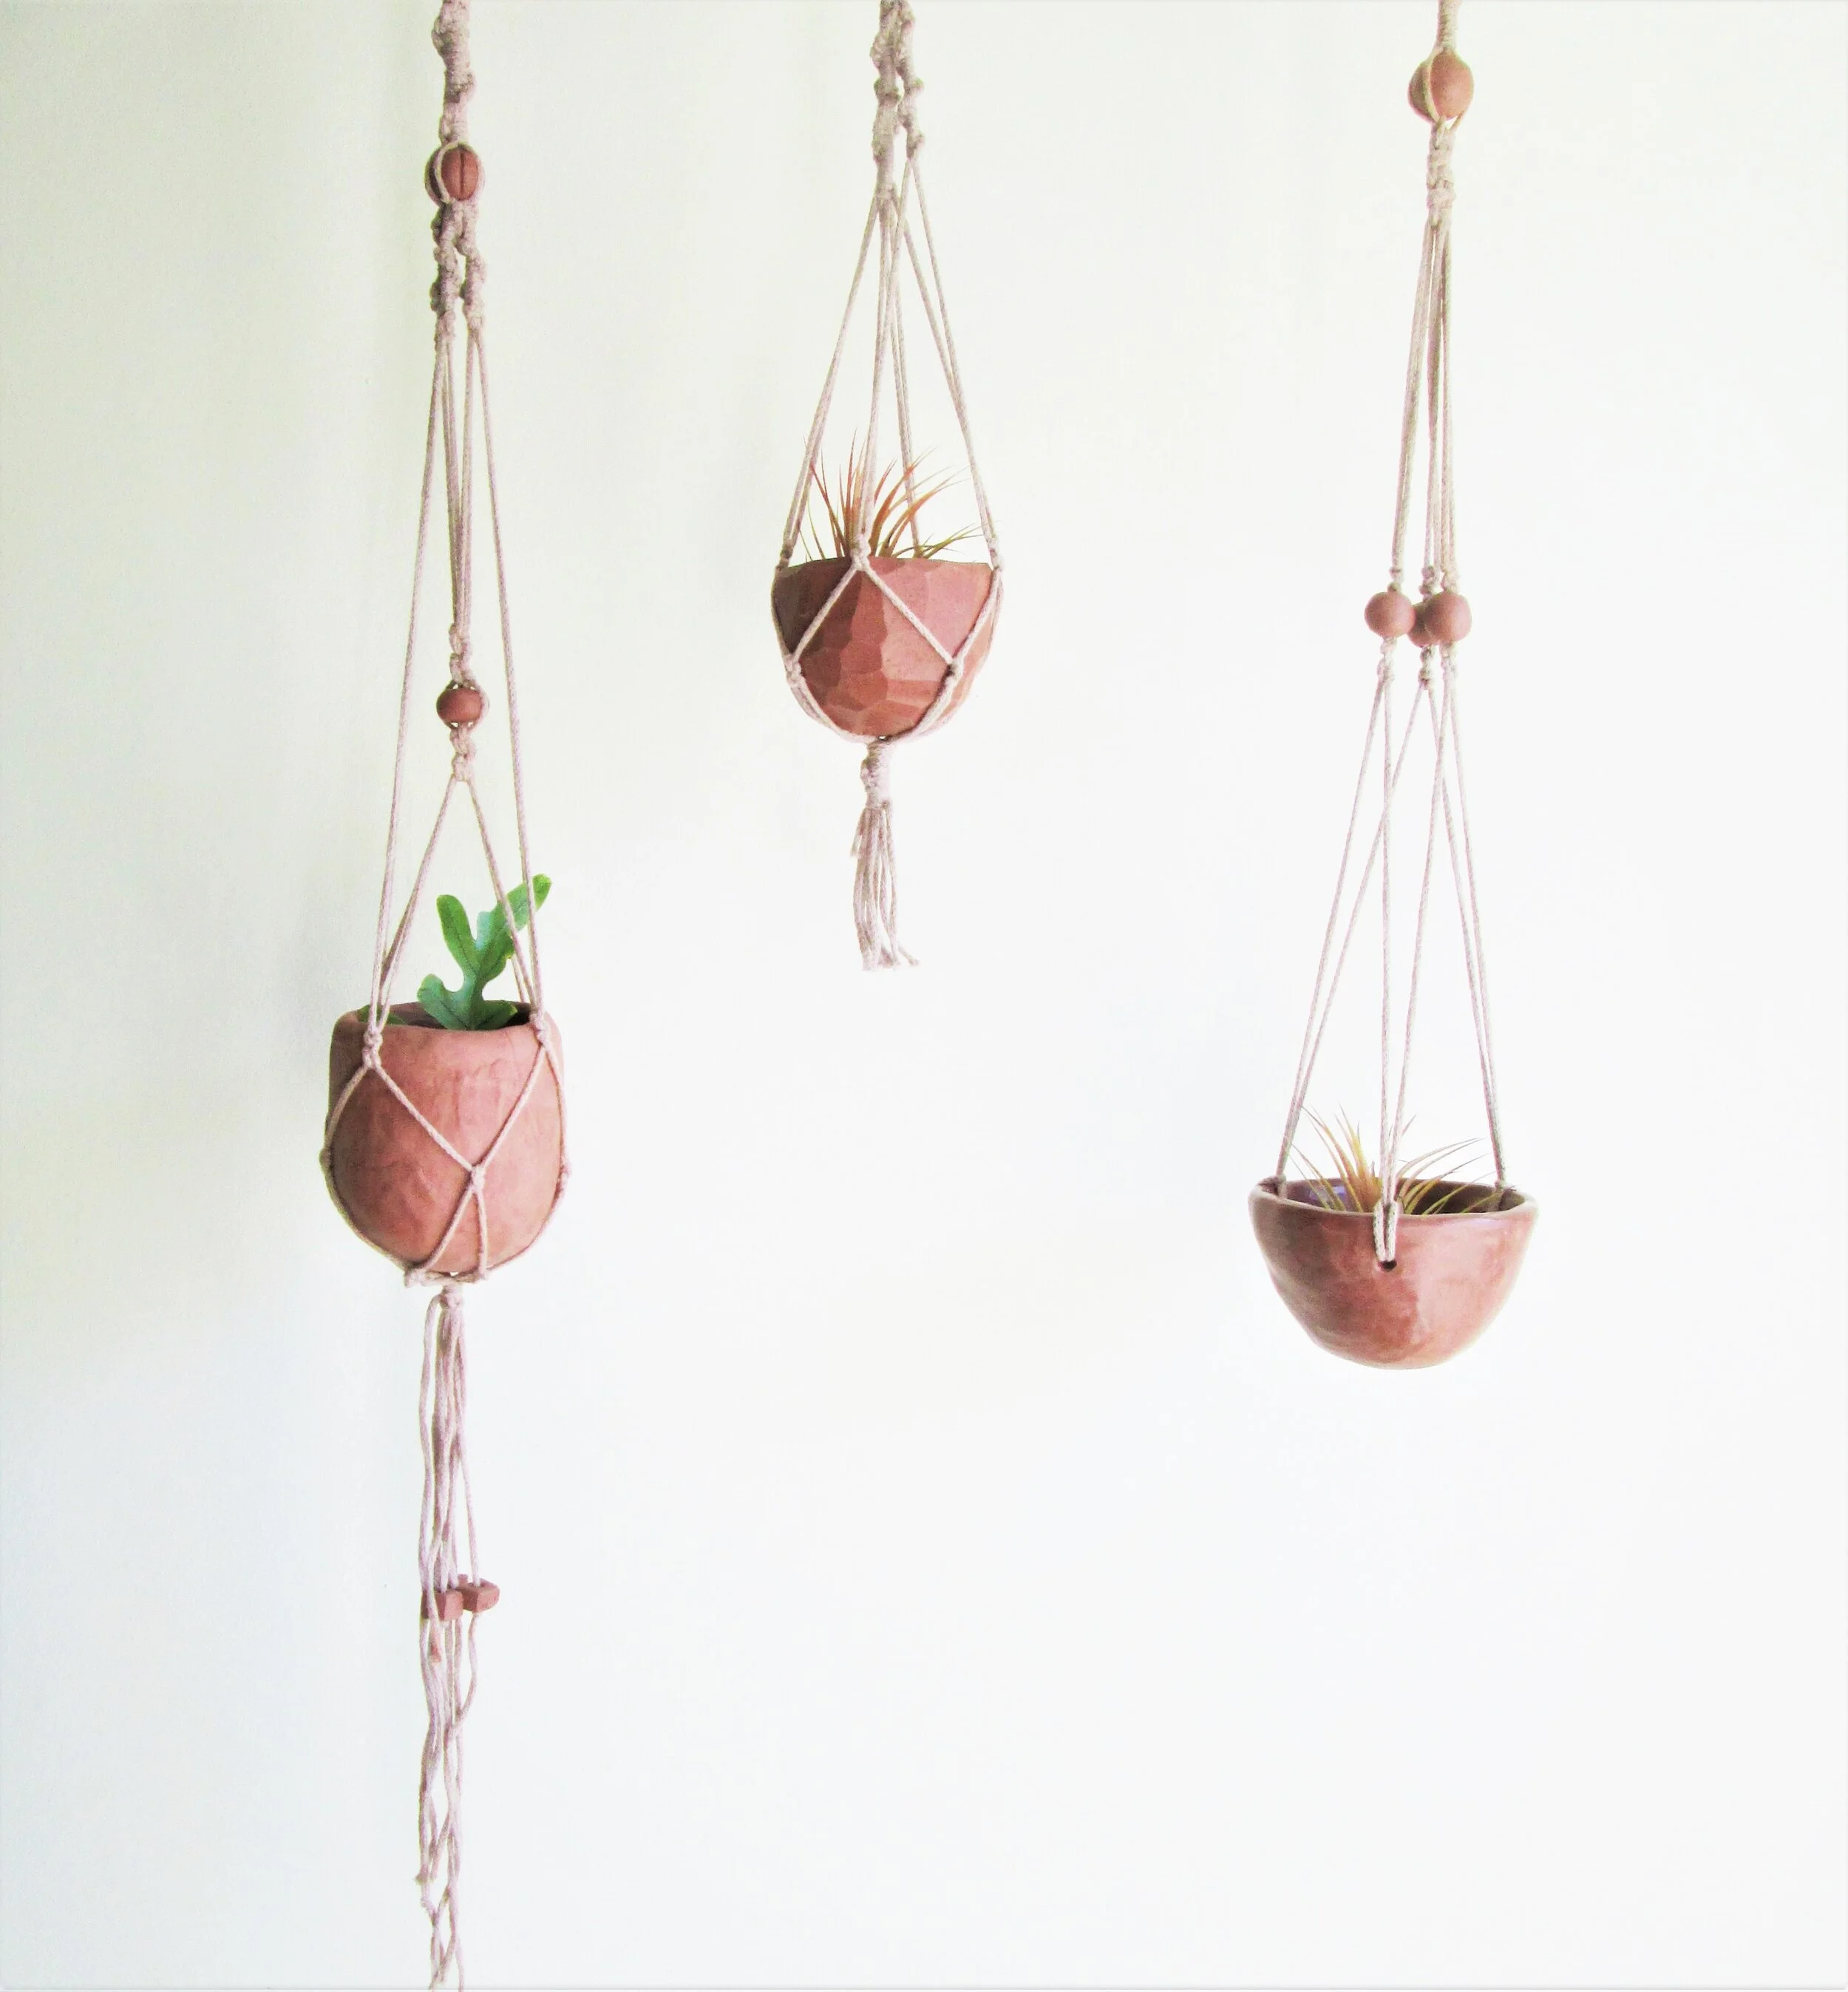
I made all three planters using just two types of knot - the loop knot and the square knot. This was a mistake in my opinion as there are lots of really nice knots out there. So I’m going to show you some good ones to use and how I got the shapes of my various planters. Below you will find videos of the knots and then below that I have divided the blog into three sections, one for each planter, including labelled images listing the knots I would use if I did this again.
Gathering knot
Use this one to start your planters. Once you’ve doubled over your threads (more on that later), use this knot to create a loop which you will hang your planter from. It keeps everything tidy and looks good. You will need to use a separate piece of thread for this so make sure you keep some aside.
Twisted Knot
This seems to be a really common knot used in macrame. Once you get the hang of it, it’s really straightforward. Your knots will start to twist as you go so make sure you keep them all tight and tidy.
Square Knot
This one is exactly the same as the twisted knot, but you need to switch sides as you go. In doing this, you always have the same thread running on top. In this video I have the blue thread going over the top and the black going behind. If you can practice with different coloured threads it might help you to see if you’ve made a mistake. This knot doesn’t give the same twisting effect but instead you get a more symmetrical result.
Square knot with two threads
I don’t actually know if this is what this knot is called but to keep things simple I’ve called it that. It is essentially the square knot but without the threads running through the middle. This is the knot I use to build the ‘nest’ that the pots sit in. It can be a bit of a mind bender so have a bit of practice before you go for the real thing.
Loop Knot
This and the square not is pretty much the only knots I used for my planters. It’s similar to the twisted knot but can be done with just two threads. If you ever made friendship bracelets as a kid, this knot was almost definitely in your repertoire!
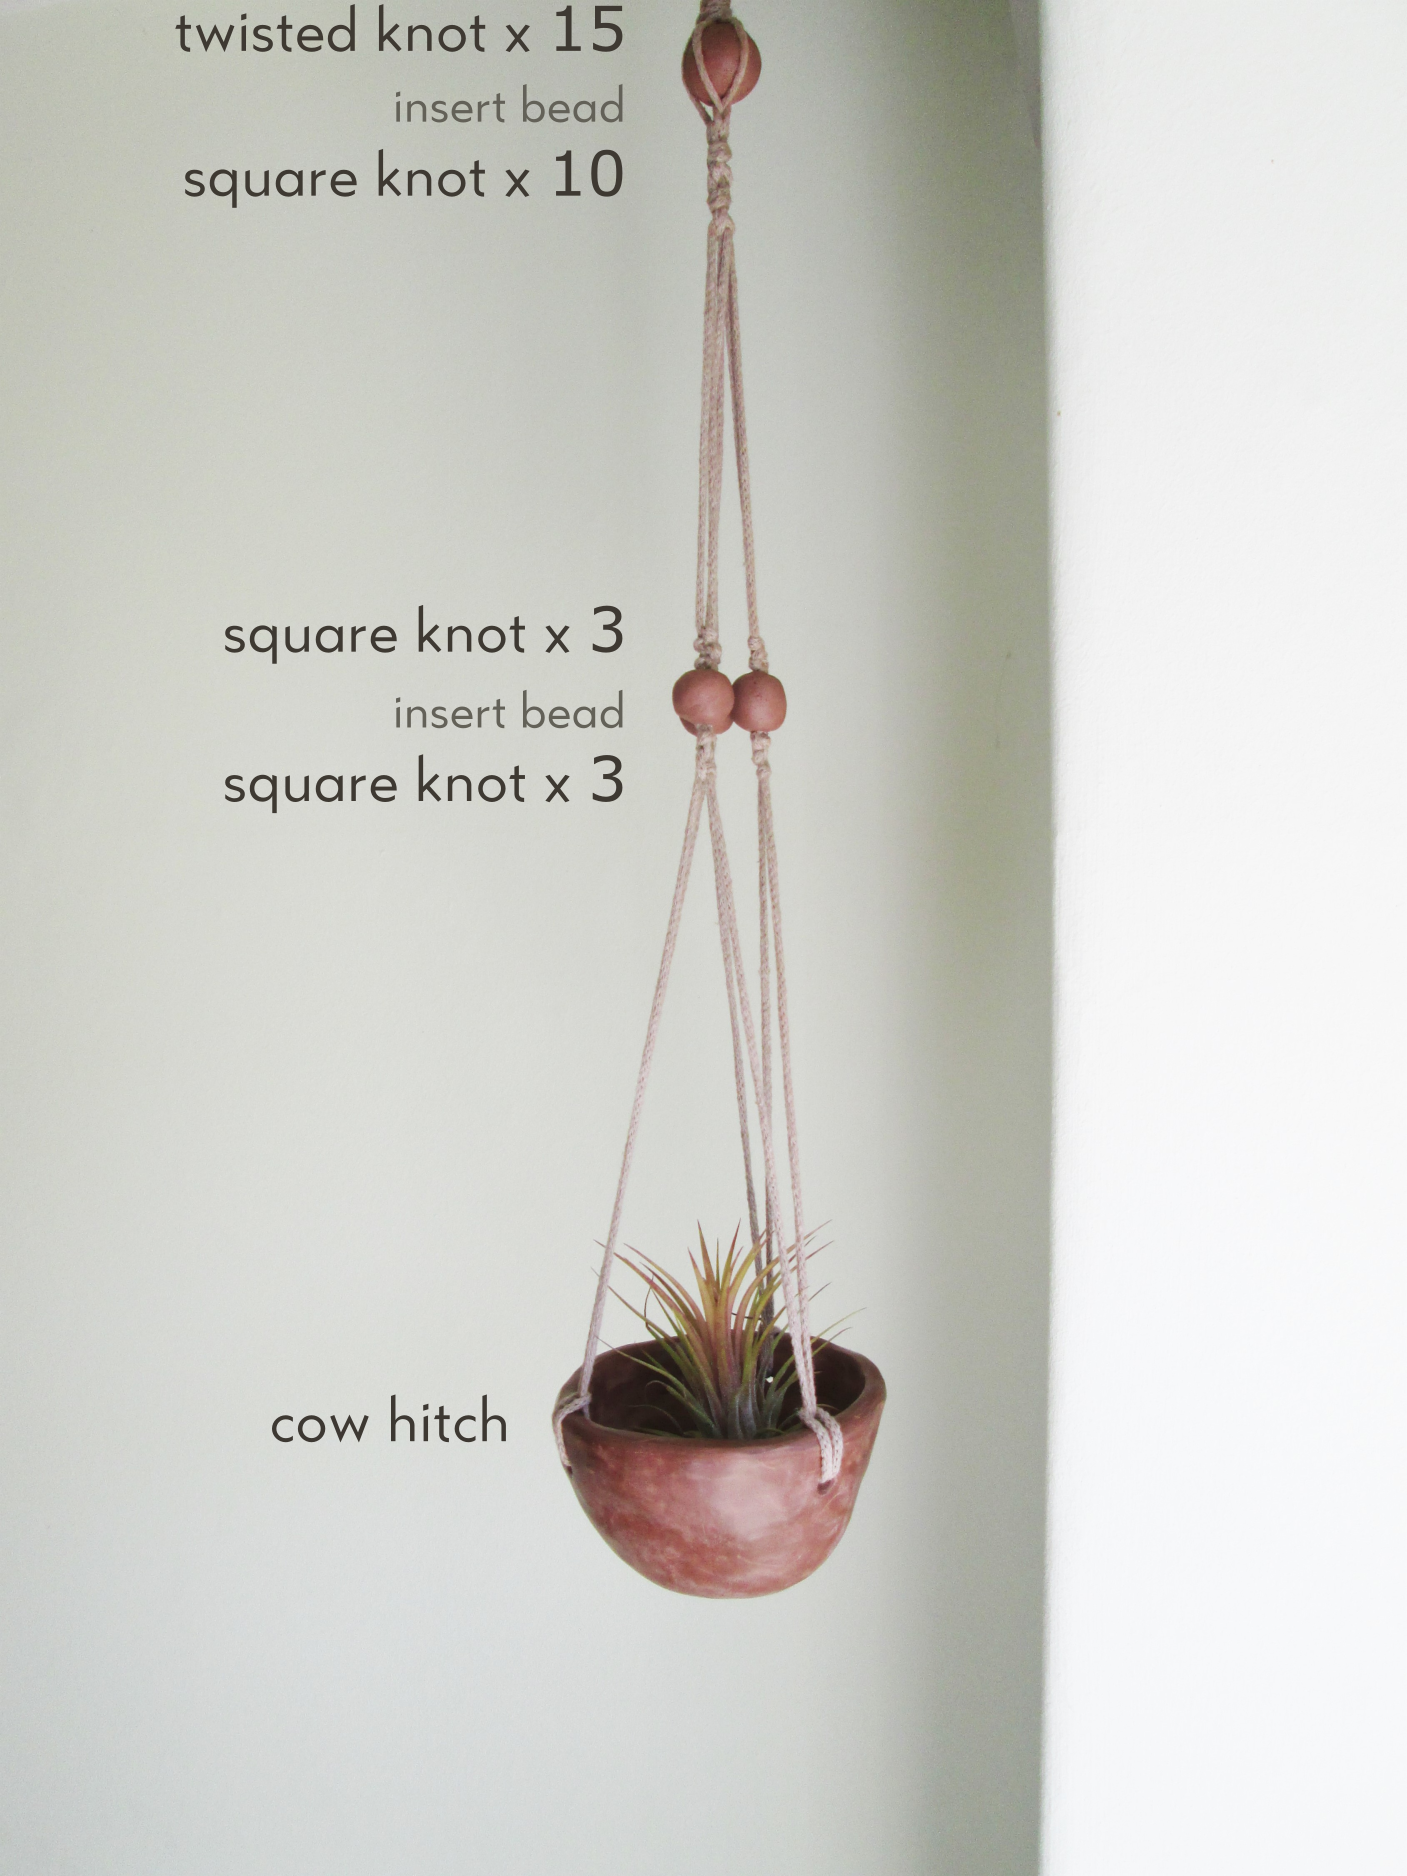
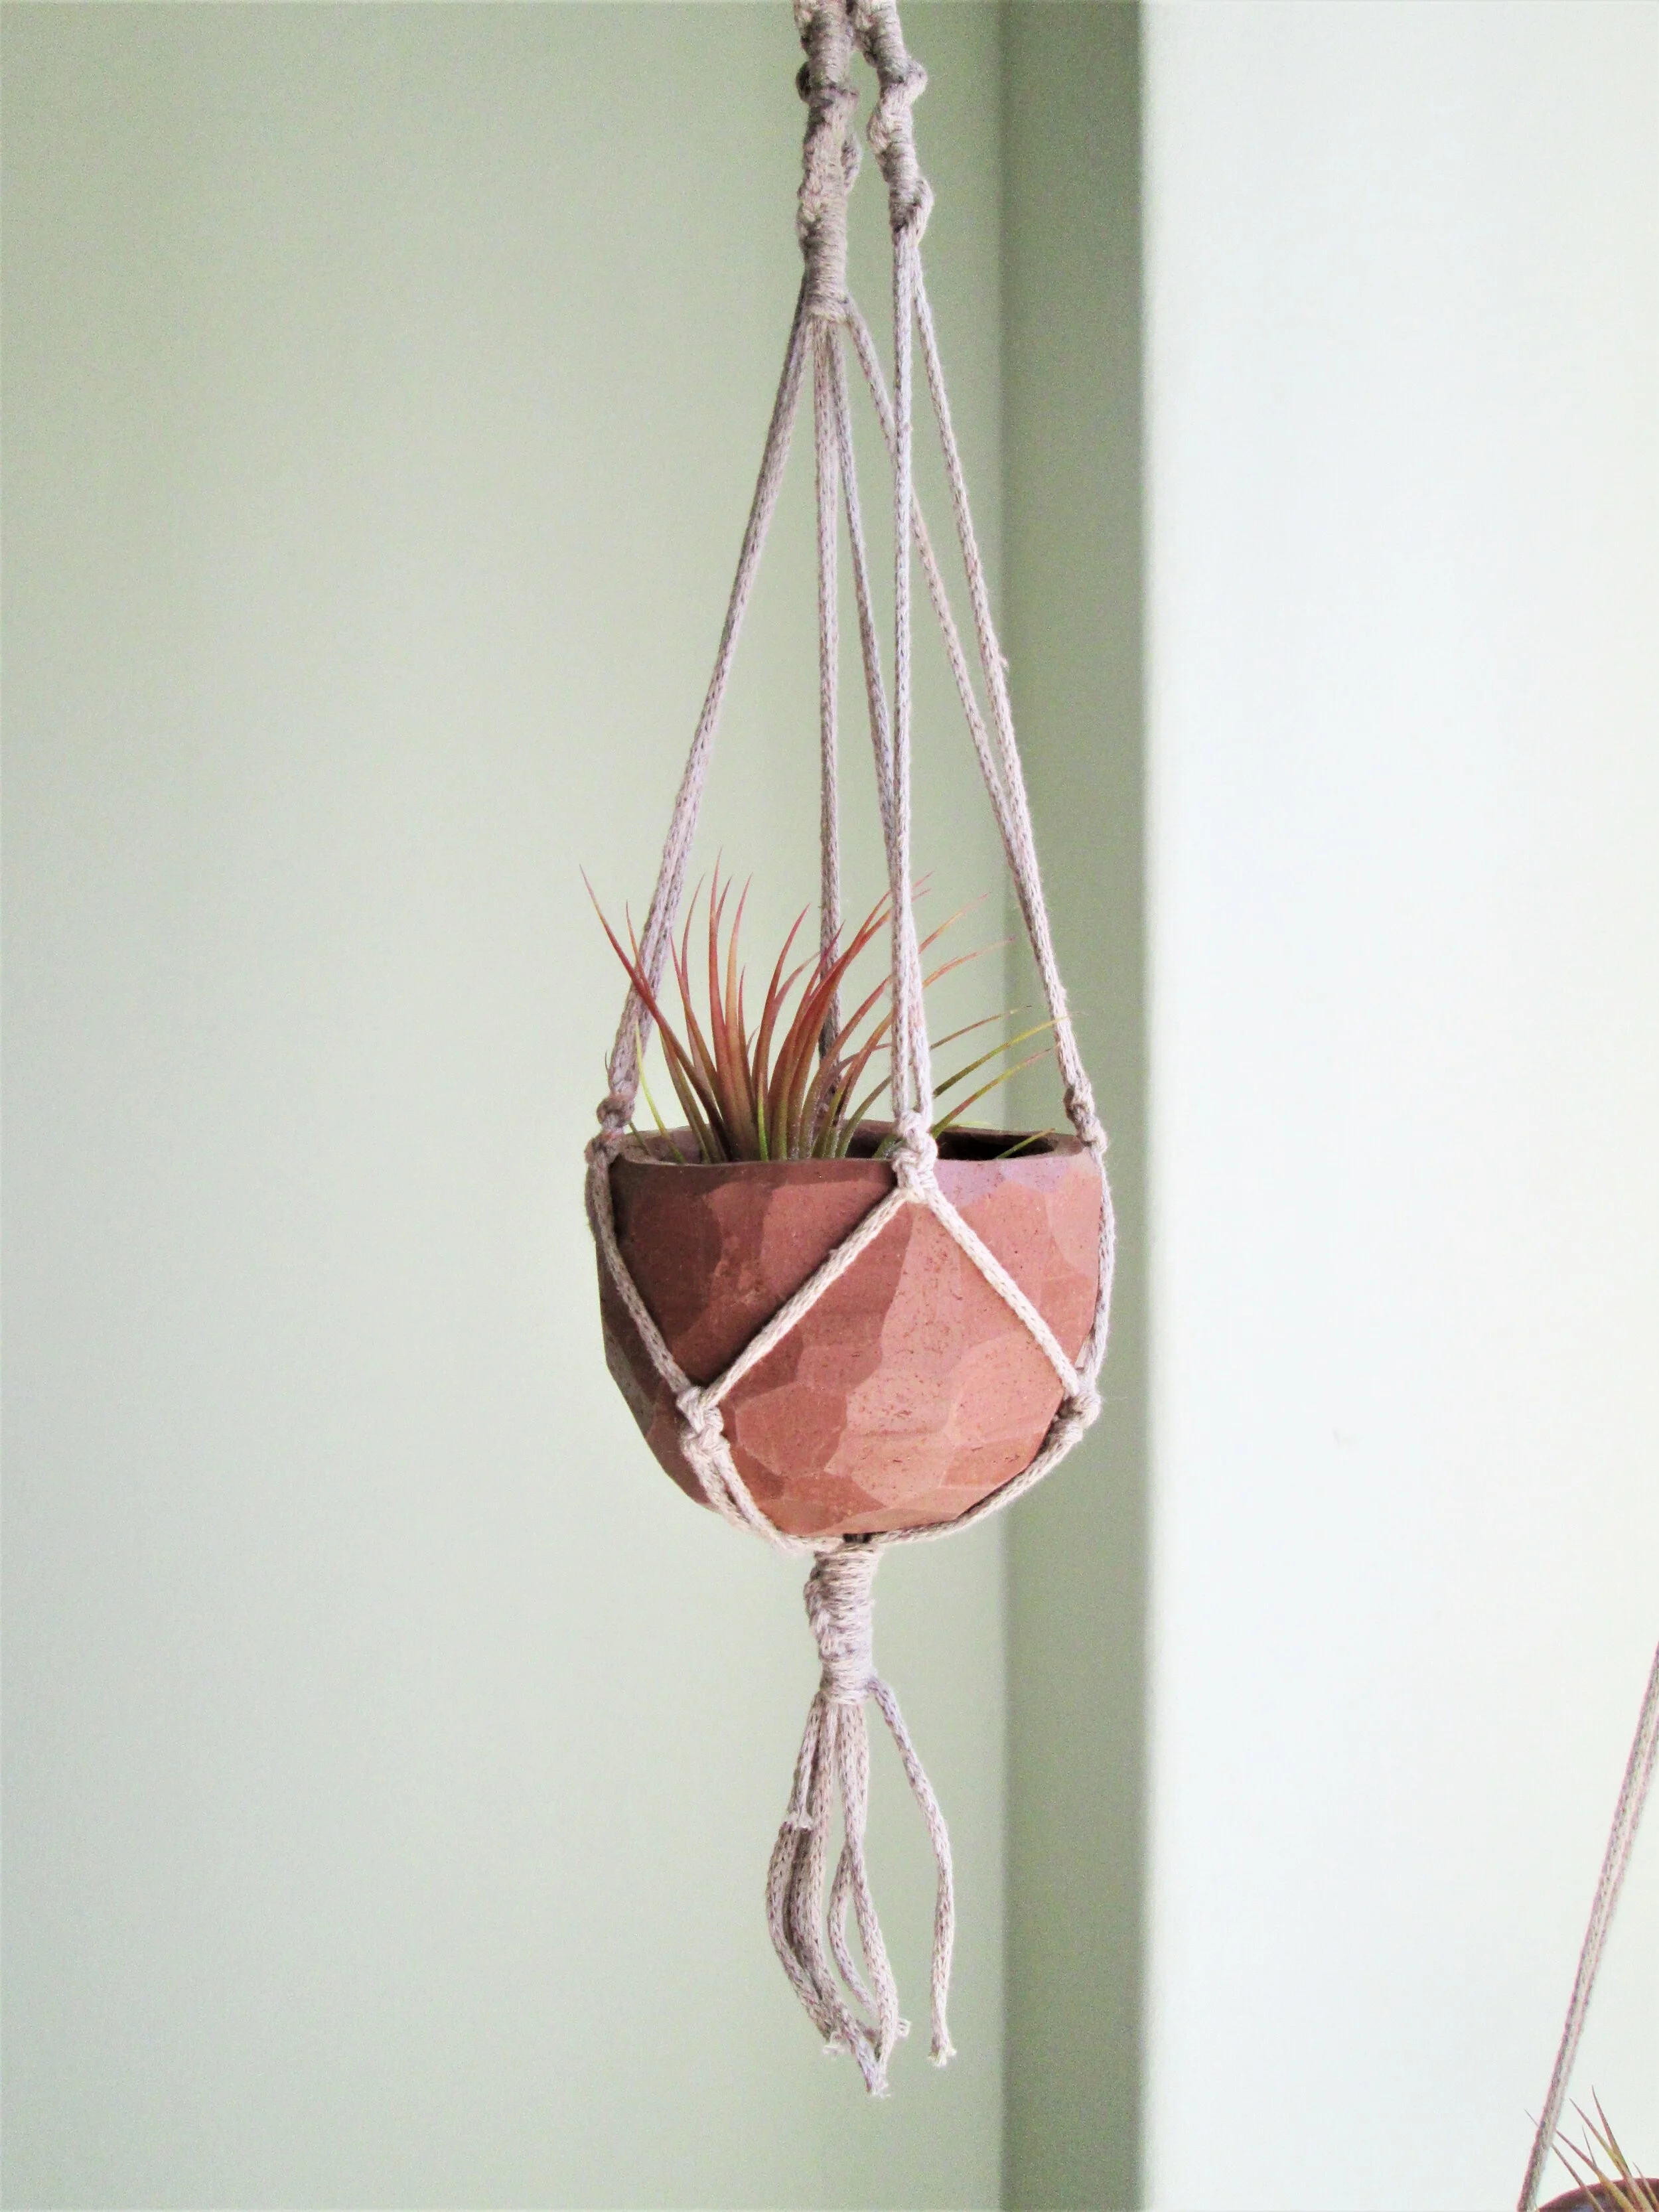
Burnished Pot
This pot is different to the others in that you have to start from the bottom, where the pot is.
Start by cutting yourself 3 x 2.5m lengths of cord/thread. Fold one in half and push the loop through a hole in your pot from the inside. Then feed the end of the threads through the loop so the thread is attached to the pot. Repeat with the other three holes. This is called a cow hitch and there is a close up image below to give you a better idea.
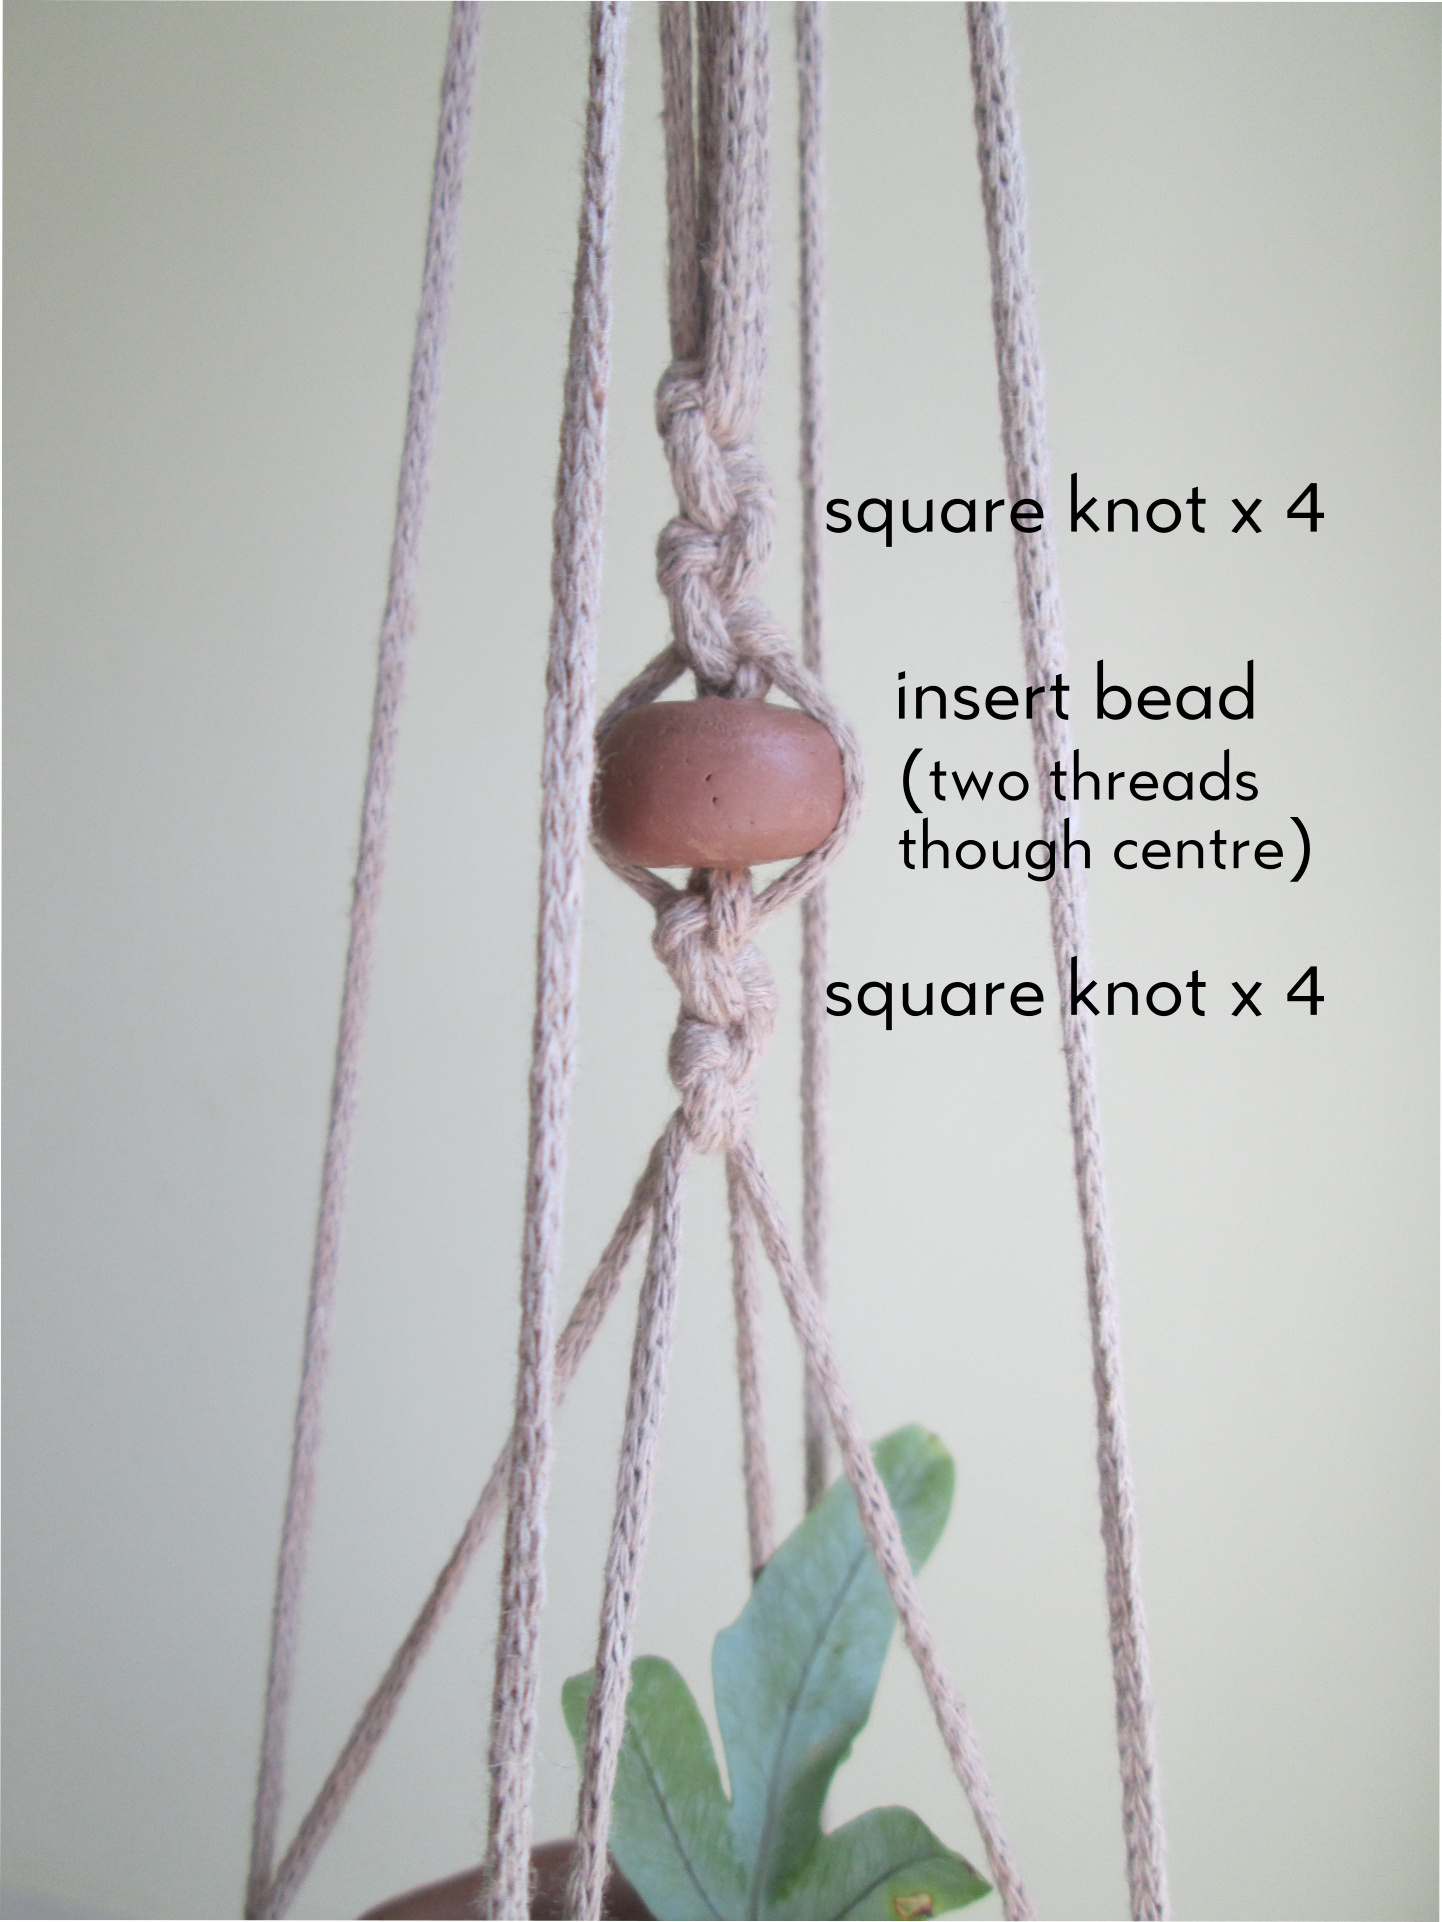
Once you’ve done this, take one thread from one hole and another from the hole next to it and tie three ‘square knots with two threads’ about 10 - 15cm up the thread. This will form a triangle one of the three triangle shapes you see when the planter is hanging.
Thread a bead on and then tie another three square knots to secure the bead. Repeat with the remaining four threads.
Measure another 10 - 15cm up the thread and do ten square knots. You can do this with either 4 threads in the middle and one ‘working’ threads either side, or divide the six threads into twos and have two working threads either side. This will give you a more chunky knot.
Insert the bead with two threads going through the centre and four on the outside.
Finish with 15 twisted knots and a gathering not if you choose to do so and then tie it off so you have something to hang it by.

Cow hitch close up
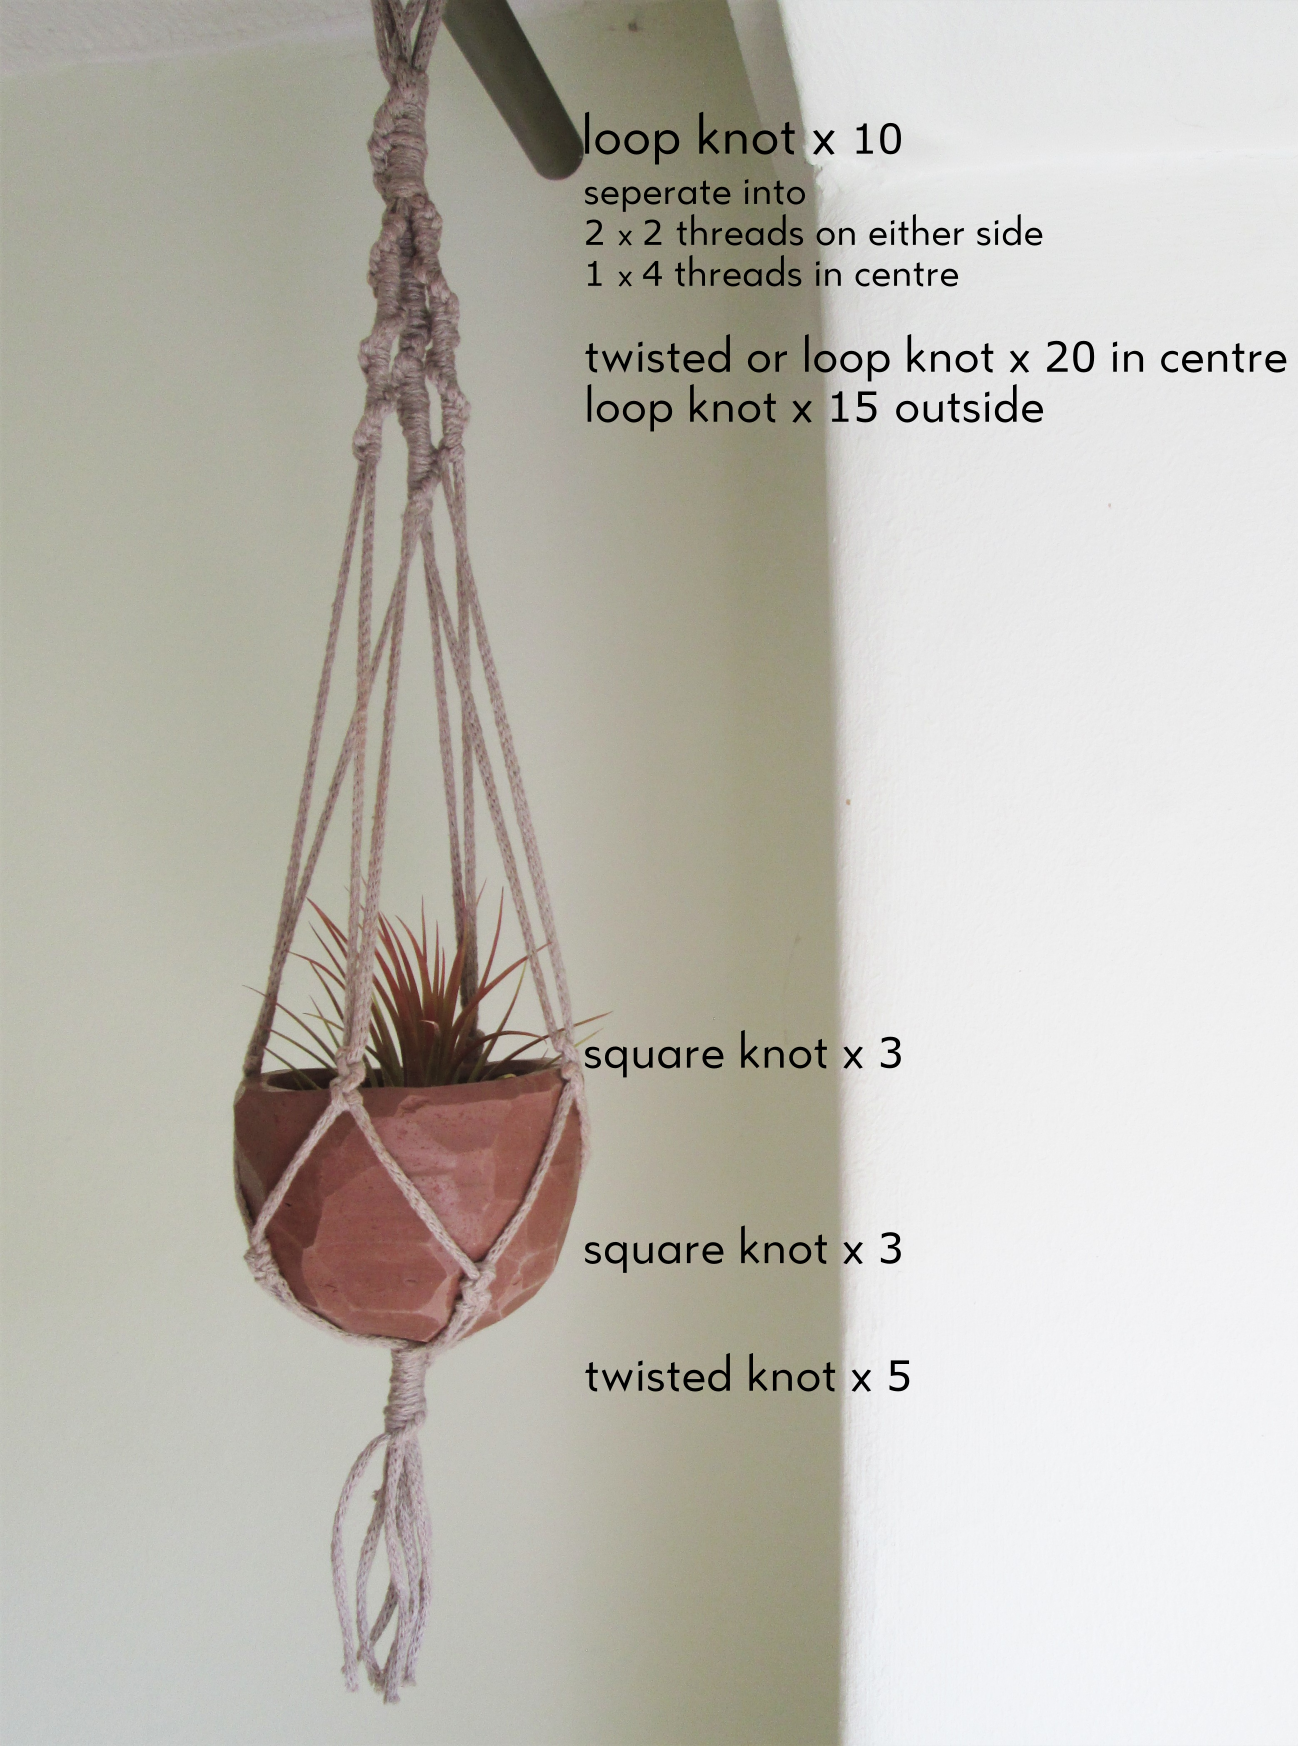
Geometric Pot
Start this pot with the traditional macrame planter method, from the top. Measure out 4 x 1.5m threads and fold them in half so you have eight threads to work with and a loop at the top where you can hang your planter. Once you get to this point, it’s a good idea to hang your planter somewhere so you can work on it comfortably. I pinned mine to the curtain with a safety pin.
Do a gathering knot first if you want to and then 10 or so twisted or loop knots.
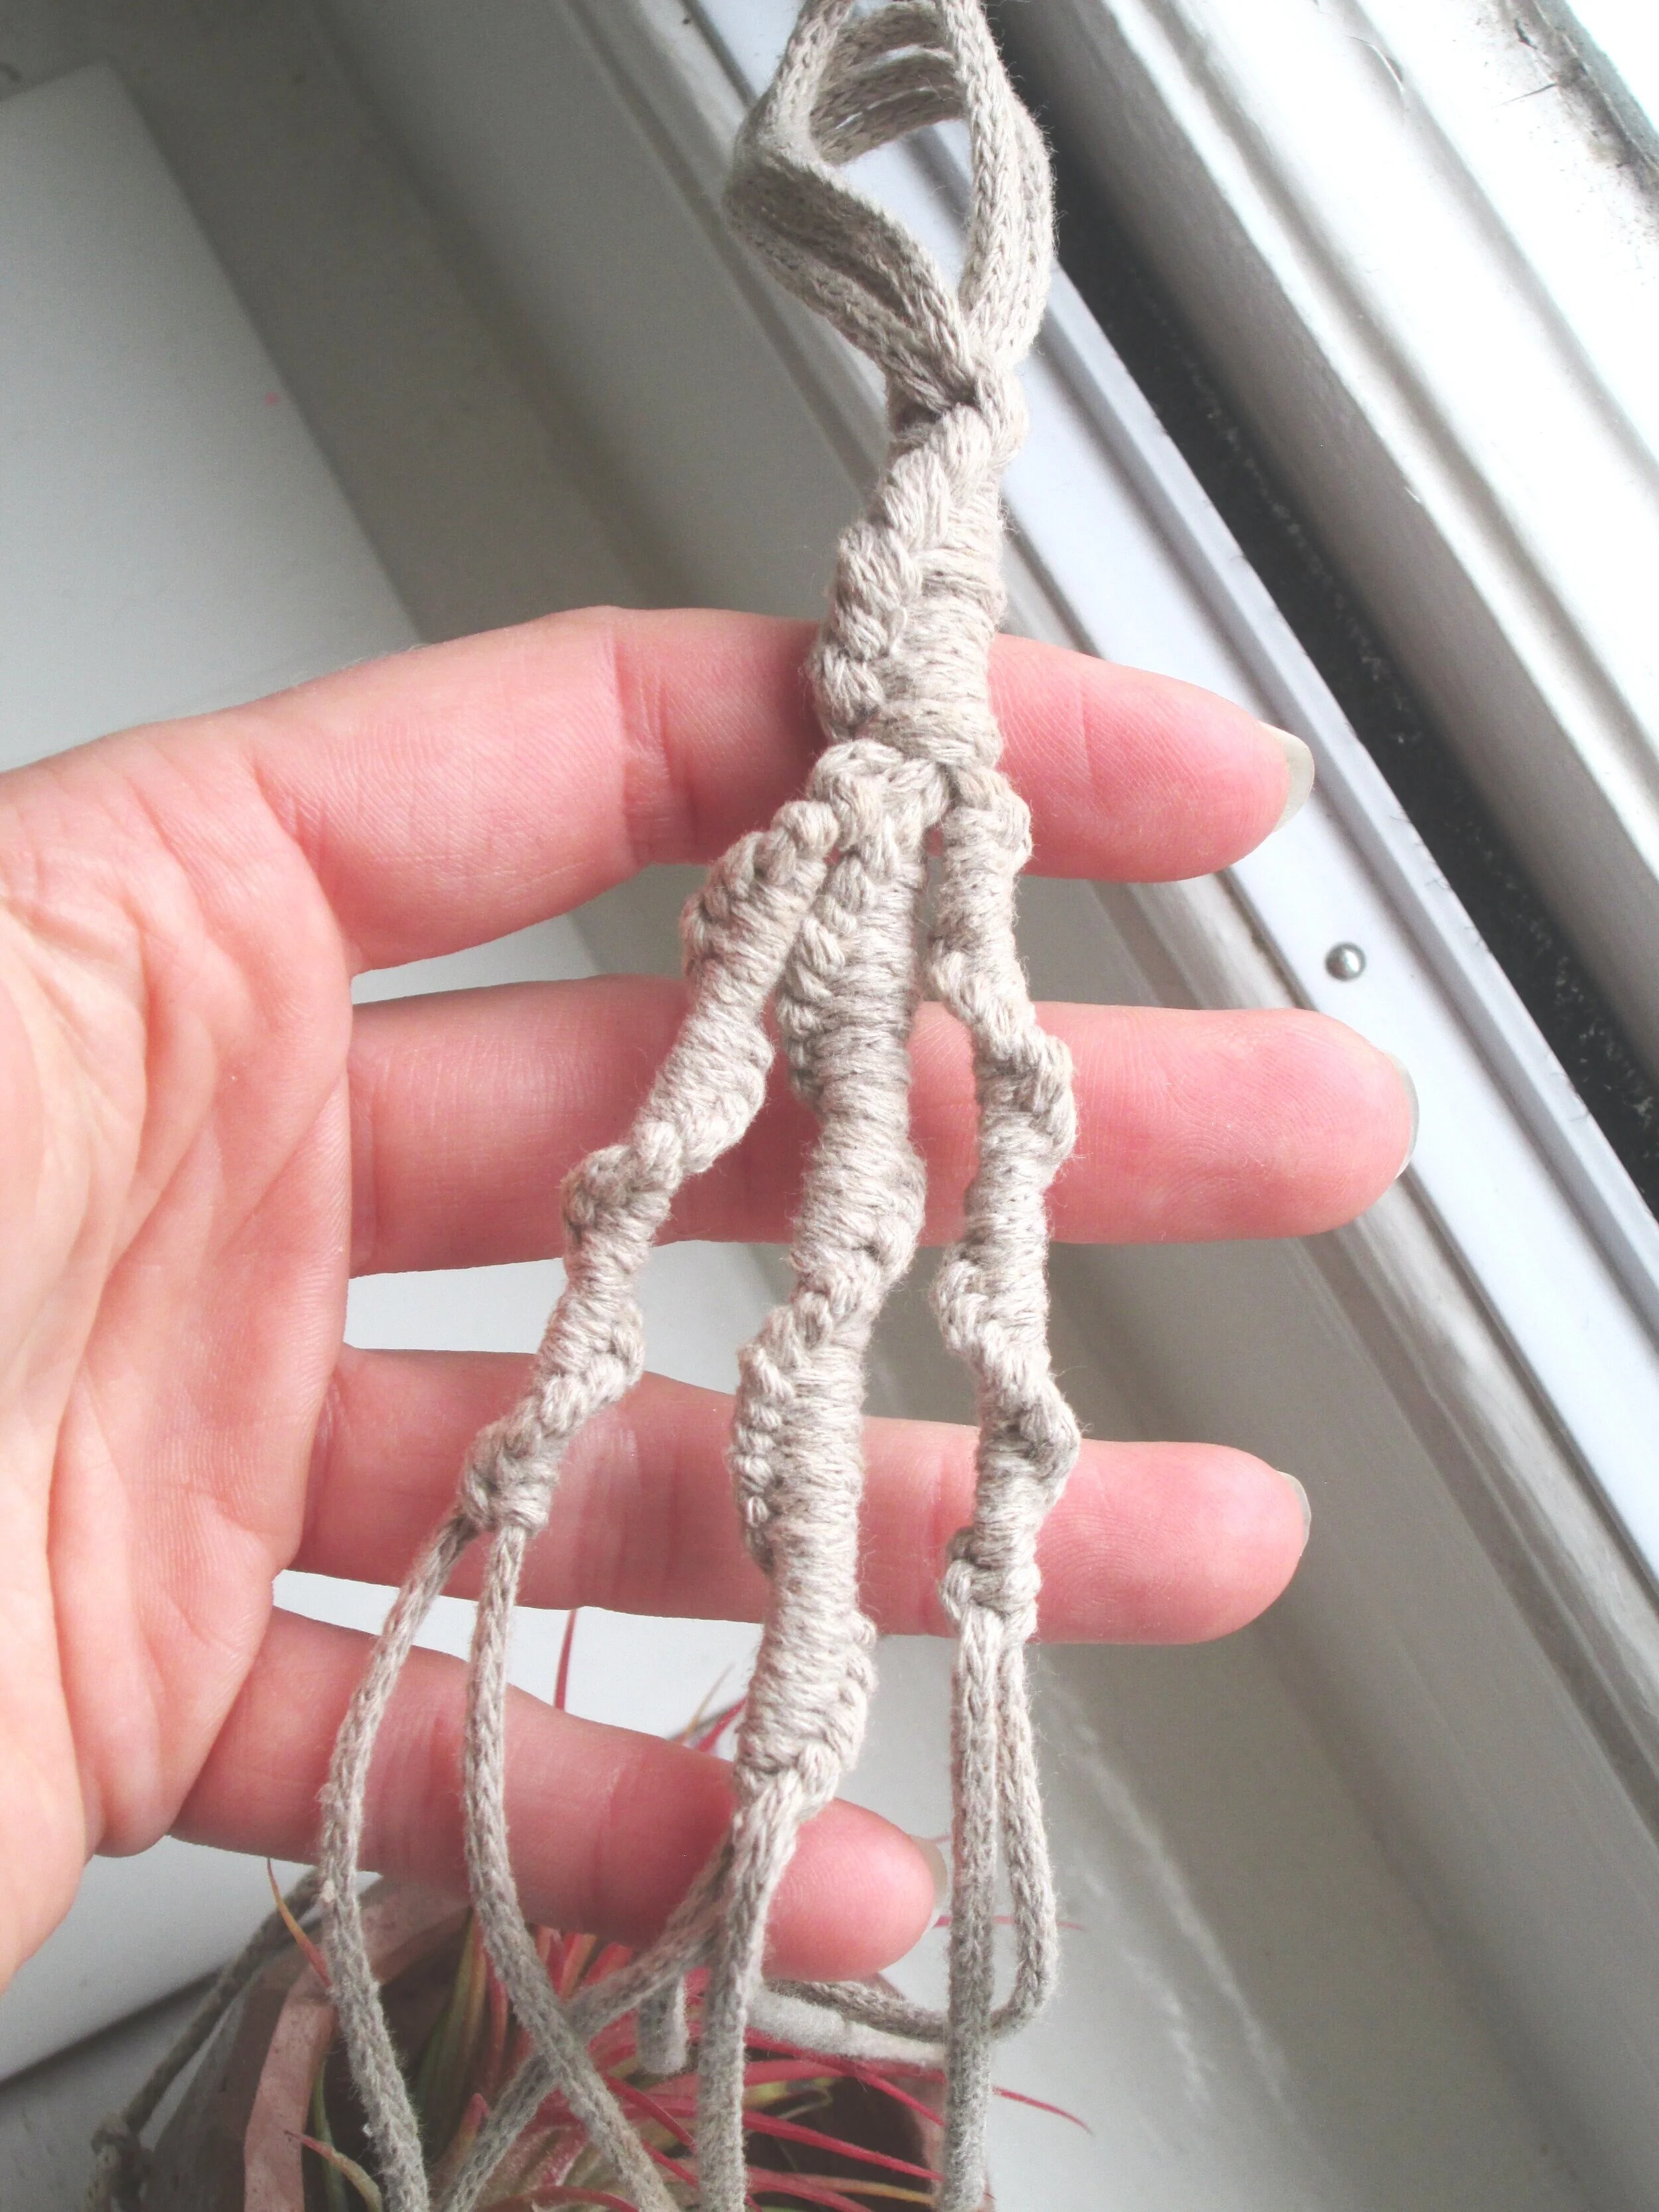
Then separate your threads so you have four threads grouped together in the centre and two groups of two on either side.
Do 20 twisted or loop knots in the centre.
Do 15 loop knots on both sides.
Then it gets a bit fiddly. You want to take one thread from the centre and one from the outside and tie three ‘square knot with two threads’ about 15cm down the thread. Repeat this with all four centre threads but make sure all your knots are at the same level. This is going to form the top of your ‘nest’.
Repeat these knots with threads from adjacent knots , leaving 5cm gaps so you start to build a nest. Be careful to make sure all the gaps are the same distance or you will have a wonky planter.
Before tying off with a twisted knot, check your pot fits comfortably in the nest.
From this image you can see I divided the threads so there was four in the middle and two on either side. When you place your pot in the hanger, you get the effect of two pyramids on top of eachother.
The pot that went wrong!
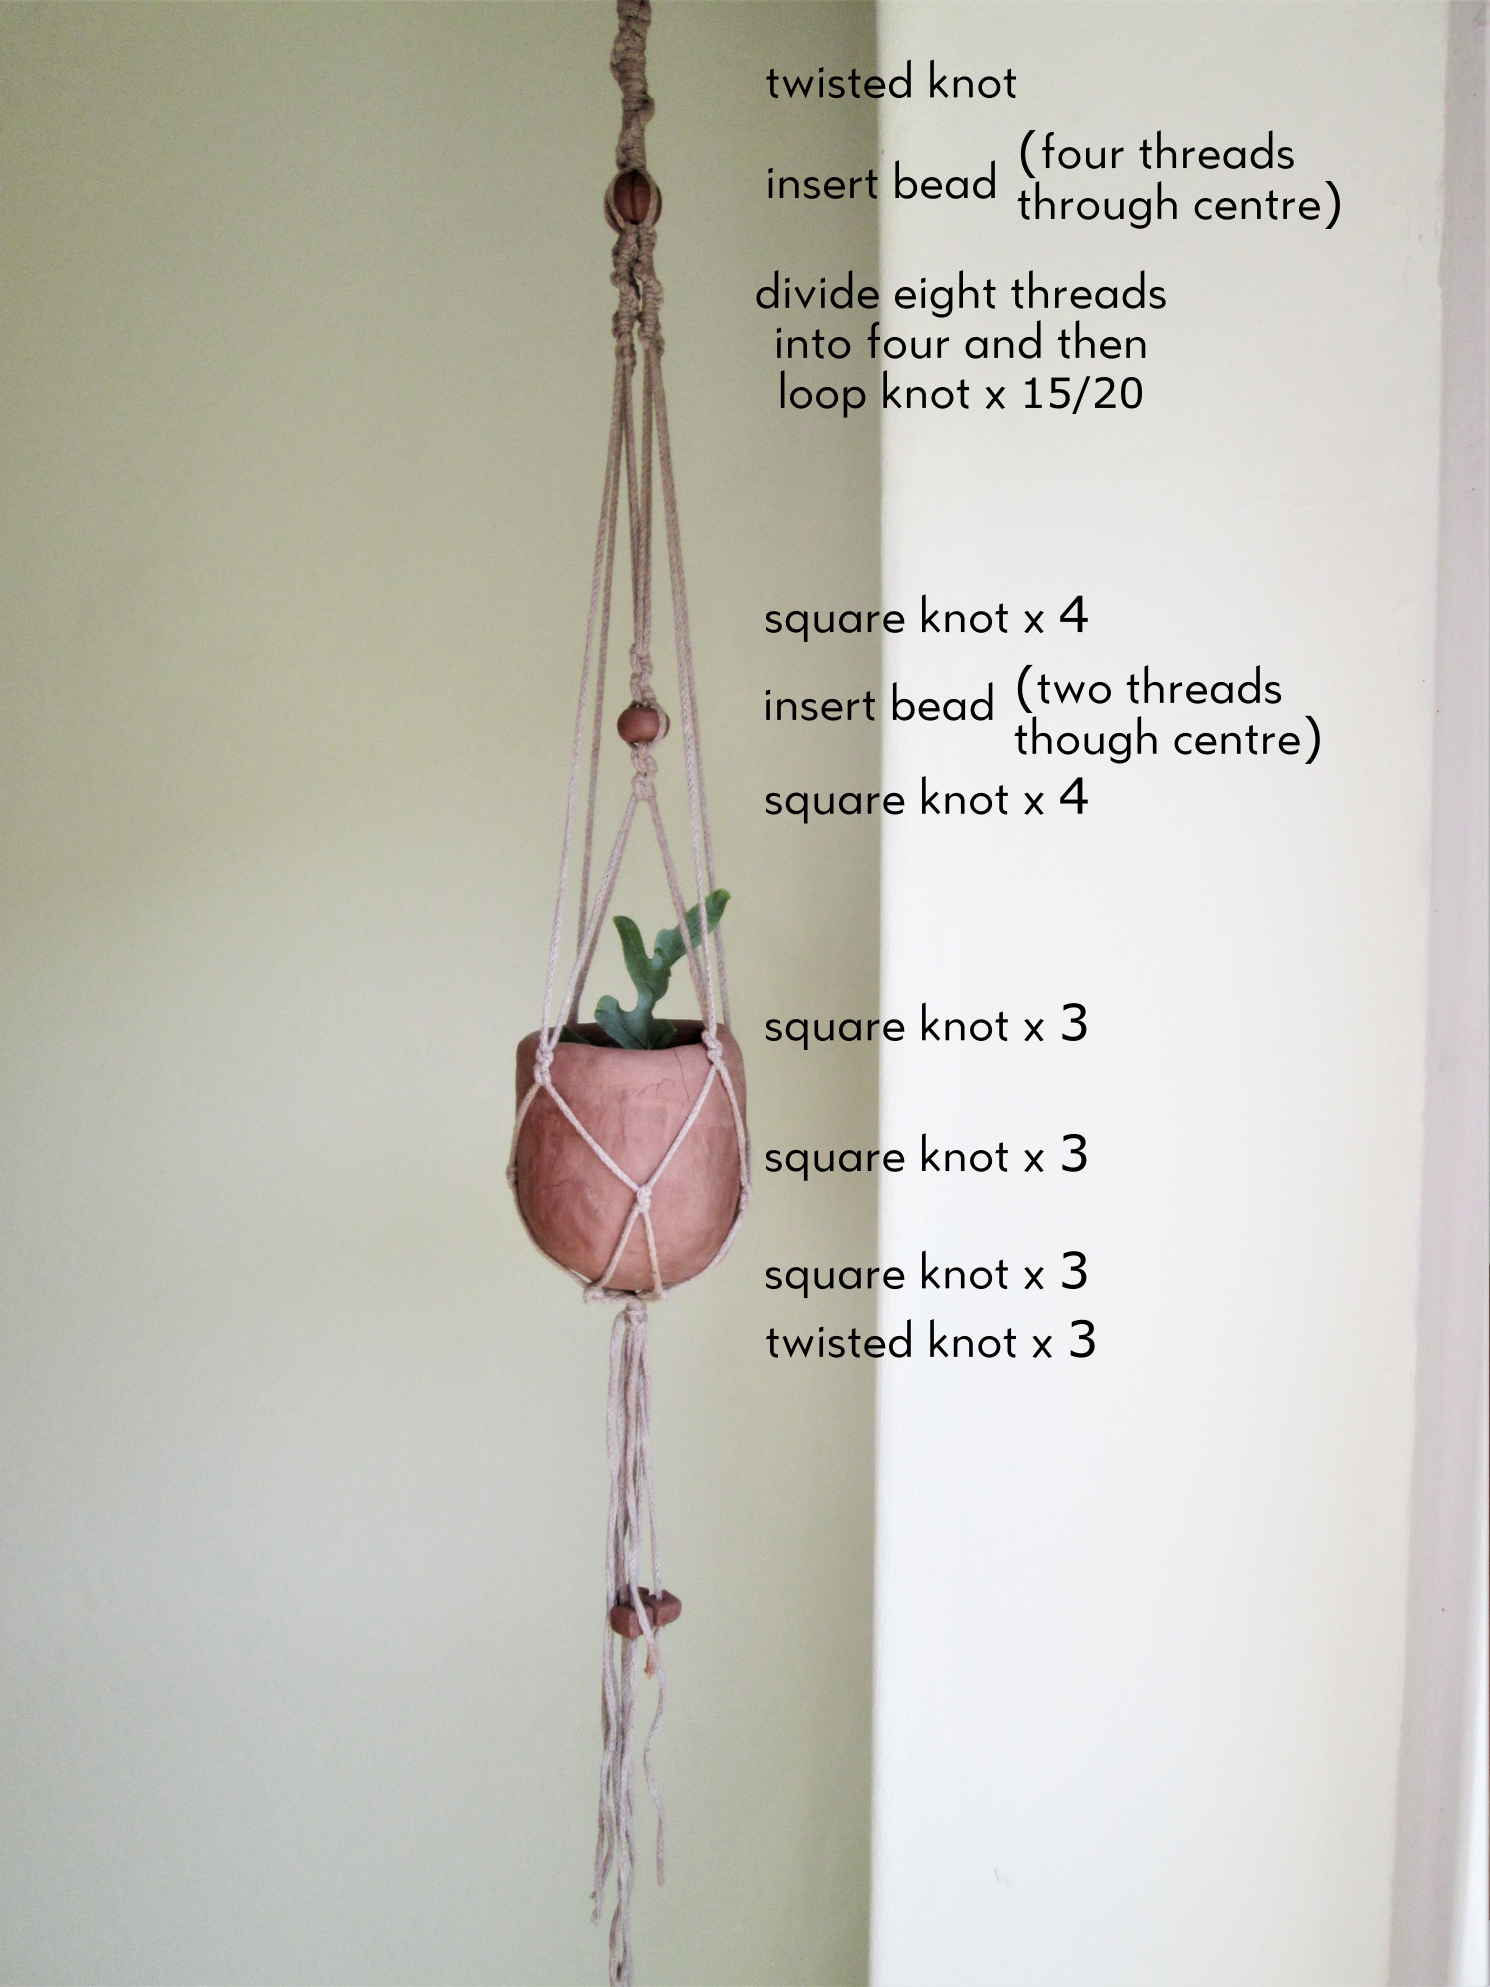
This was the last pot I did so I really went for it! Start in the same way as you did with the geometric pot but with longer threads - about 2m.
Put your gathering not in place and then start with your twisted knots. Do as many as you like, I did about 30.
Insert your bead, with four threads going through the centre, and then divide your eight threads into four groups of two and continue with loop knots. (more detailed picture below)
Then leave a 10cm gap and take one thread from each group of two so you have four threads in the centre and do four square knots. Insert your bead with two threads going through the centre and two on the outside. Repeat four square knots.
Create the ‘nest’ in the same way as above and tie off with three or more twisted knots.
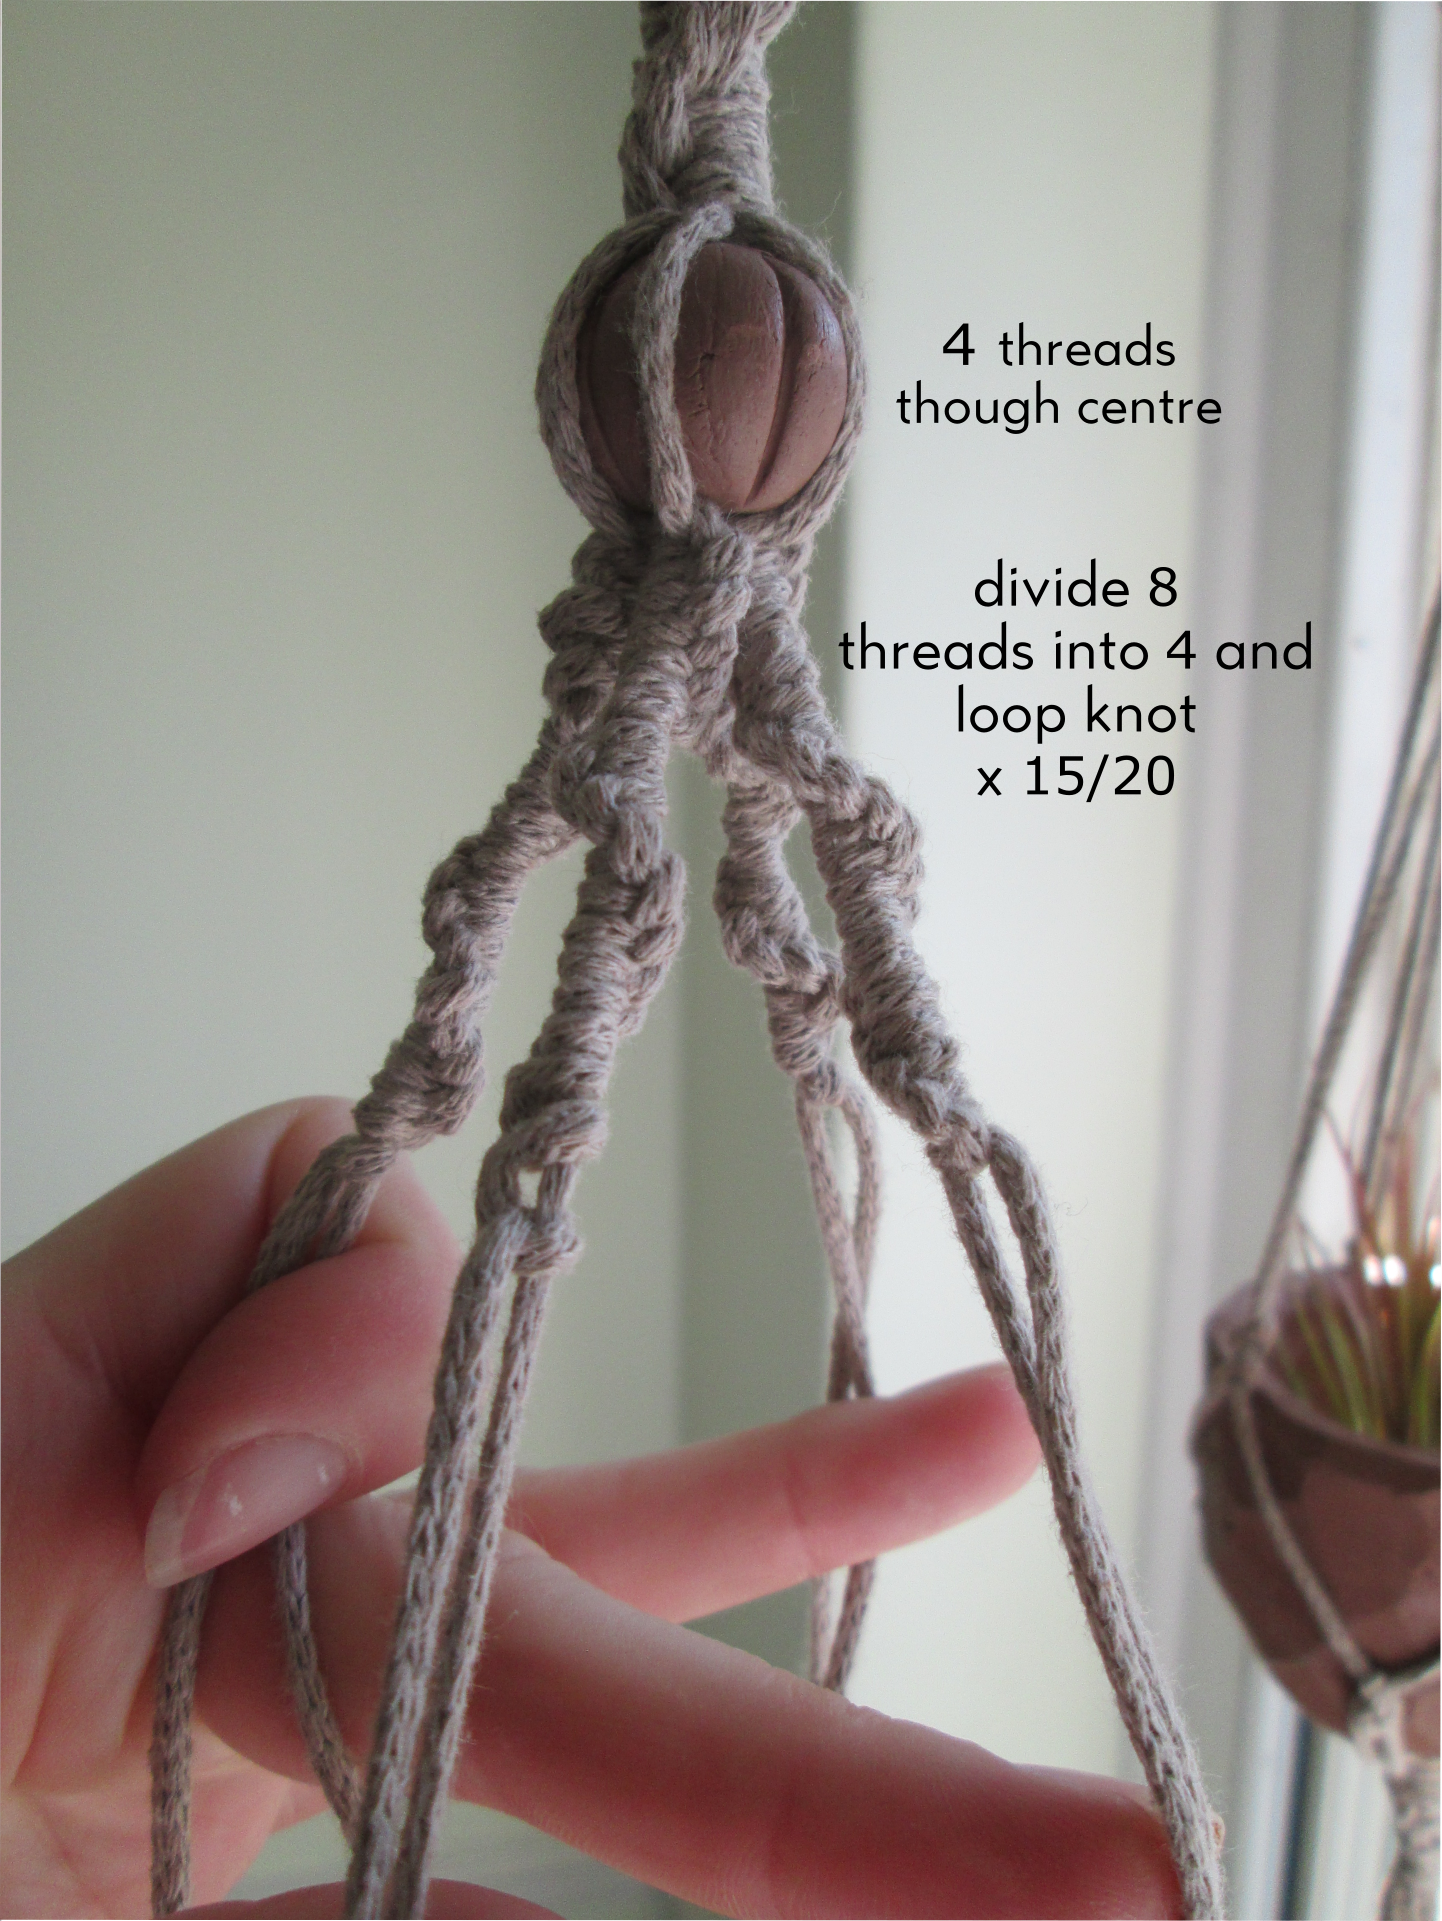
This image should give you a better idea of what happens after you put the first bead in place.
This image will give you a closer look at what is going on in the centre of this plant hanger. You might notice that I got my square knot wrong here…yours will look much nicer and neater than this if you get it right!
This is a bit of a long rambling post but hopefully it should give you an idea of how I made my hangers. It’s probably quite important for you to know that I spent at least two hours getting knots wrong and making a mess of things before I got these results…and even these aren’t right! So this might take a bit of practice. Be patient with yourself and make it really easy for yourself to start by choosing a really simple design.
The air plants I bought are flourishing in the window and have gone a lovely red colour. They’re looking much more healthy than when I bought them and I haven’t done anything to look after them. It must be the lovely new homes :)